In the realm of data science having a powerful, flexible, and accessible computational, analysis, and visualization environment is essential. Google Colaboratory (aka, CoLab) offers just that. It’s a free, cloud-based platform that allows you to write and execute Python code in a Jupyter notebook environment, making it an excellent tool for both beginners and experienced practitioners. This guide will walk you through the basics of getting started with Google Colab.

What is Colab?
Google Colab is a product from Google Research that allows anyone to write and execute arbitrary Python code through the browser (aka – Jupyter Notebook). It’s especially well-suited for machine learning, data analysis, and educational purposes.
Why Use Colab?
- Free Access: Google Colab provides free access to modern Jupyter Notebooks for data analysis and visualization.
- No Installation Required: Being a cloud-based service, there’s no need to install any software on your computer. All you need is a web browser and a Google account.
- Collaborative Features: Just like Google Docs and Google Sheets, Colab notebooks can be shared and edited by multiple users in real-time, making collaboration seamless.
- Integration with Google Drive: You can save your notebooks directly to your Google Drive, ensuring easy access and sharing.
Getting Started
Step 1: Accessing Google Colab
- Open your web browser and go to Google Colab.
- Sign in with your Google account.
Step 2: Notebook Selection Window
After signing in, the Notebook Selection window will pop up. This window displays a list of your recent notebooks, allowing you to access and open them. The Notebook Selection window also allows you to import Jupyter Notebooks from Google Drive and GitHub or upload a notebook from your computer.
If you are new to Colab, the ‘Welcome to Colaboratory‘ introduction provided by Google is an excellent place to get started with links examples covering most of the basics. Once on the Colab homepage, click on Examples to see a list of useful tutorials that can be copied into your personal Google Drive (and can be renamed, run, edited, or used as templates).
Click on the Open notebook button to get to the pop-up window for Examples, as well as recent notebooks and any notebooks you have in your Google Drive or on GitHub (or want to Upload).

Step 3: Creating a New Notebook
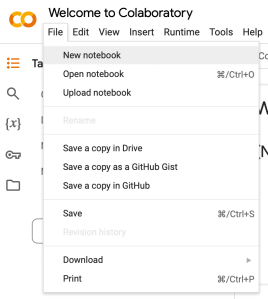
Once on the Colab homepage, click on the New notebook button. You might get a pop-up like the image below where you can click the button New notebook in the lower left corner. If not you can always click File → New notebook.
This will open a new tab with a fresh notebook where you can start writing and executing Python code and Markdown text. In the beginning, it is common to just copy and rename one of the example notebooks as a template.
Step 4: Adding Notebook Content
A notebook consists of a list of cells. Google Colab notebooks have two main types of cells: code cells (+ Code) and text cells (+ Text). Code cells allow you to write and run Python code, while text cells let you add formatted text, images, and equations using Markdown. The first few cells in the welcome notebook are text cells.
Text Cells – These cells contain text formatted using markdown language. All kinds of formatting features are available like making text bold and italic, displaying ordered or unordered list, rendering tabular contents, etc. Markdown cells are especially useful to provide documentation to the computational process of the notebook.
To create a new text cell, click the + Text button in the toolbar. A new Markdown cell will be added below the currently selected cell. You can view and edit the Markdown source of a text cell by double-clicking it. In editor mode, Colab will show the Markdown source and the rendered version side-by-side. You can exit the editor mode by pressing Shift+Enter, clicking the Close Markdown Editor icon in the top-right corner of the text cell, or clicking another cell.
Code Cells – Contents in this cell are treated as statements in a programming language of current kernel. Default kernel is Python. So, we can write Python statements in a code cell. When such cell is run, its result is displayed in an output cell. The output may be text, image, plots or HTML tables. Code cells have rich text capability. For example, adding a code cell (click on + Code) and typing print(“Hello World!”) and then to execute the Python code, click the ‘run’ button to the left of the cell (or Shift-Enter).

You can write Python code in the code cell and execute it by pressing Shift + Enter or clicking the Play button on the left side of the cell. Any output from the code will appear directly below the code cell. We can also use code cells to access the command line by adding an exclamation point at the start of the cell. We can use this ability to install Python packages via the pip package installer.
Step 4: Run, Name, Save Your Notebook
- To execute a code cell, click the ‘run’ button to the left of the cell or hold down the Shift key and type Enter (Shift-Enter).
- To execute a text cell, type Shift-Enter or just use your mouse to click outside of the text editing window area. This should get you out of the editing mode and show the resulting (Markdown) formatted text.
It is also recommended that you rename the notebook. To change the name (title) of your Colab notebook, just click on the title and rename as you wish.

To save a copy of your notebook on your local computer. You can navigate to File → Download and pick the appropriate extension.

